Meta (Facebook) Conversions API: Why it is needed and how to set it up?

Facebook ads agency ringwood

If you’re concerned about your increased Cost Per Result, then keep reading, this article is for you!


First things first, what really is Facebook Conversions API? As per Meta, Conversions API is designed to create a direct connection between your marketing data and the systems, which helps optimise ad targeting, decrease cost per action, and measure results across Meta technologies.

When you think of running the ads, the first thing you must look at is your Meta Pixel connection with the website. The pixel tracks data from the browser as well as the server. However, due to ad blockers, Apple restrictions, and the like, browser-level data tracking has become restricted. Therefore, there occurred a need to track data using the server-level connection. Conversions API does just that. 

The Facebook Conversions API creates a direct and reliable connection from your server, website platform or CRM to Meta. This tracked marketing data on Meta delivers your ads to people who are more likely to be interested in your product or service by allowing for:

  • Ad personalisation, 
  • Optimisation and 
  • Measurement 

Data from the Conversions API is less affected than the Meta pixel by browser loading errors, connectivity issues, and ad blockers. There are several options to set up the Conversions API, however, the best and the most reliable one is through Conversions API Gateway. 

But, what’s the problem with the pixel?

Essentially, ad blockers, cookie blockers, and other masking tools have begun to cut down on the amount of data the pixel receives. And now, Apple’s iOS 14+ update is creating even bigger hurdles to tracking data through the pixel.

The iOS 14 update highly restricts the use of cookies for tracking on Apple mobile devices. That means the pixel alone will give you a lot less information about how iOS users interact with your business. If someone clicks through to your website from Facebook, you might not know.

Facebook expects all major browsers to block or significantly limit third-party cookies by 2022 which means ad targeting will be affected, and the size of your custom audiences and retargeting audiences will likely decrease.

Benefits of the Facebook Conversions API

Here are the top 3 benefits of setting up the Conversions API: 

1. Reduce your cost per action: When you use the Conversions API alongside the pixel, it creates a more reliable connection that helps the delivery system decrease your cost per action.

2. Improve measurement: The Conversions API can help you better measure ad performance and attribution across your customer’s full journey, from discovery to conversion. This helps you better understand how digital advertising affects both online and offline results.

3. Increase data control. Along with the pixel, the Conversions API gives you more control over what you share and when you share it.

We set up the Facebook conversions API for a client in the recent past and achieved 

  • 37% reduction in the Cost per Lead 
  • 75.92% increase in Landing Page views
Facebook Conversions API-3

If you would like us to set up the Conversions API for you, then please send us an email to dreamworxmarketingagency@gmail.com


How to setup Conversions API

While there are many ways to set it up, the best and most reliable way to do it is by Partner Integration through the Conversions API Gateway

The Conversions API Gateway can be setup using an Amazon Web Services (AWS) account.  Below are the steps to setup through the Conversions API Gateway.

You set up an AWS account for free. Monthly costs will apply based on usage levels. If you really want to find out the expected costs, you can use the AWS calculator (https://calculator.aws/#/).

Step 1– Navigate to the Settings tab within Meta Events Manager. Under “Set up with Conversions API Gateway”, click on Get Started.

Facebook Conversions API-3


Step 2– Follow the instructions as you go. Under Choose web address for application, a subdomain name will be auto-populated; however, it can be modified to any name you choose.

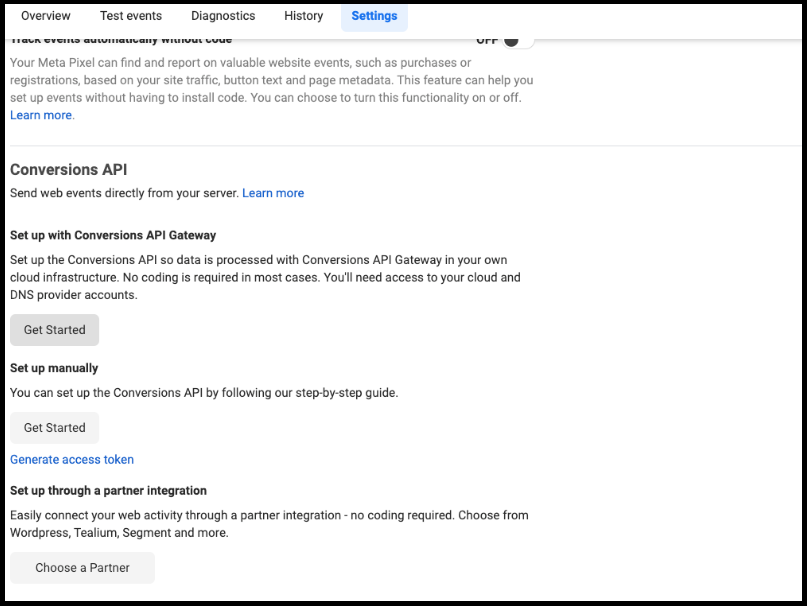
This subdomain represents the Conversions API Gateway Endpoint, where you’ll be able to access the Conversions API Gateway UI after setup is complete. Please note to keep Advanced Matching turned on.

Step 3- Choose the Amazon Web Services deployment option. A quick creation flow for the Conversions API Gateway stack will open, based on the CloudFormation template.

  • Please don’t change the pre-populated fields aside from the Stack name, which you can rename based on your preference. Complete the remaining fields. Create an Admin Email and Admin Password, that will be used to access the Conversions API Gateway UI. Use t3.large for Instance Type.
  • Click Create stack to begin the installation.
  • The creation process takes approximately 5 minutes, after which two outputs will be written to the “Outputs” tab for the new AWS instance. You will know it is done when the Status says: CREATE_COMPLETE in the Stack info Tab.
  • Once complete, go to the “Outputs” tab.
  • Take note of the IP under Call To Action, as you’ll need to add this as an A name record for the subdomain you specified earlier.
  • Take note of the Conversions API Gateway Instance URL, which you’ll need to provision the Conversions API Gateway UI.

Step 4- Set up your AWS Account by visiting the URL: https://aws.amazon.com/ and log in to AWS if you have not already done so.

Step 5- A quick creation flow for the Conversions API Gateway stack will open, based on the CloudFormation template. A number of fields will be pre-populated, but please don’t change these aside from the Stack name, which you can rename based on your preference. Complete the remaining fields. Admin Email and Admin Password will be used to access the Conversions API Gateway UI. Click Create stack to begin the installation.

Click Create Stack and follow the prompts.

Step 6- Set up your DNS by accessing your DNS provider, the most widely used is Cloudflare.

Step 7- Go to the Conversions API Gateway Instance URL, and click on the URL. A new webpage will appear titled Conversions API Gateway is provisioning. This URL indicates that Conversions API Gateway is being installed. Setup takes approximately 15 minutes, and then the Gateway UI will be accessible. You will get the message “provisioning finished” once the setup is done.

Step 8- To access the Conversions API Gateway Admin UI, use the subdomain link (Conversions API Endpoint) from step #2.

Select Log in by using the Username is “AdminEmail” and Password is “AdminPassword” from step #3

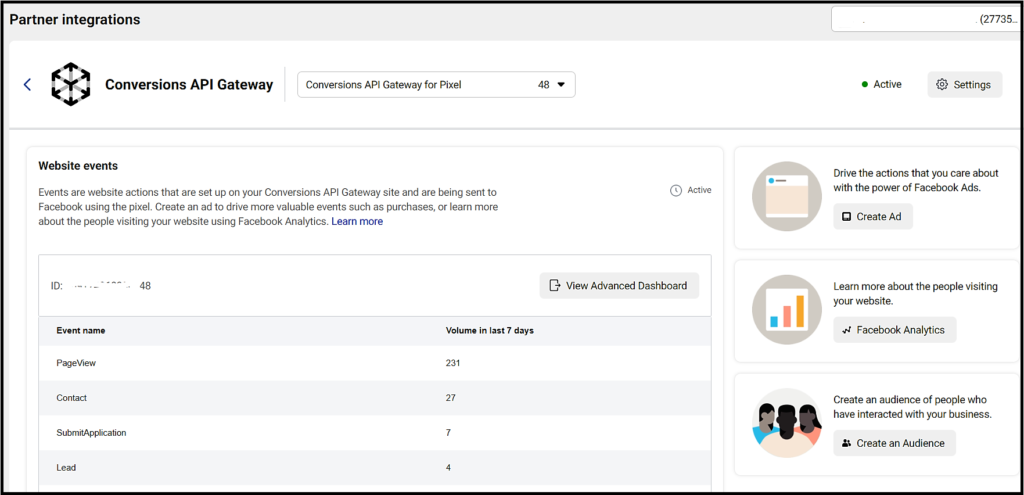
You will see the Conversions API Gateway Admin UI site. When you first view the site, the server and browser data may be at 0. This information can take 5 minutes – to 2 hours to populate.

To check if the data is being collected, you can go to your website and refresh the page.

If events do not populate after 2 hours, please contact Facebook

Step 9- Finally, go back to the Events Manager to complete the next steps. Click Next from where you left off. Confirm the DNS record is added successfully (the “status” will be green if provisioning is completed) and click Next.

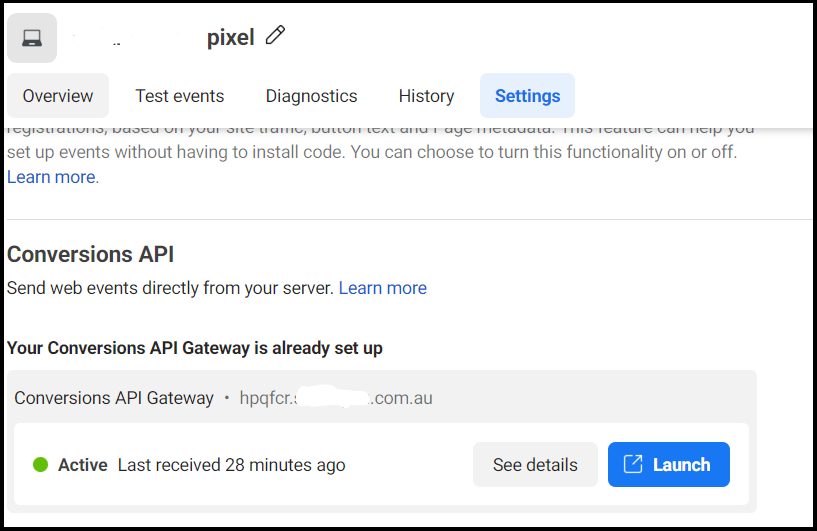
Step 10– Next, if the Launch button shows, then setup is complete.

Events Manager Reporting View

Open your events manager and check for the connection method. If you see the below then it’s all good to go.

If all this feels a bit too overwhelming, don’t worry! You’re not alone. It’s much better to get an expert complete this setup for you instead of trying to do it yourself and messing it all up.

Trust us, it’s a lot easier to do it correctly firsthand than to troubleshoot later on. Send us a direct email to set up the Facebook Conversions API for your business account.


In case of queries, please get in touch with us. Our Facebook experts will be happy to assist. Simply send an email to dreamworxmarketingagency@gmail.com

Need these tips and more sent to your inbox?

Please subcribe to our email list

More To Explore

service with a smile, our interest is in your business growth

Australia's One Stop Digital Marketing Agency

We’re relentlessly focused on getting our clients more sales, and qualified leads thus hitting their business’s growth goals. From service-based businesses to e-commerce businesses and startups, we have helped businesses in almost all major niches.

Research & Analysis

We start with an initial audit of your business website, social channels and discover the growth opportunities

Growth Strategy

We map out a plan to get on top of each growth opportunity by using tried and tested digital marketing strategies

Measure & Improvise

We measure & improvise implemented growth strategies regularly to ensure that your business stays ahead

Do You Want To Boost Your Business?

drop us a line and keep in touch

advertising agency Melbourne

Get In Touch

small_c_popup.png

Free marketing insights to help you grow your business

Join the Dream Tribe